Monday, February 8, 2010

Cabinet Knobs in the Wall

Another snow day! Don't think this one will keep me housebound all day (dang it) but for now I cannot make it up the steep hills that are on either side of my road (thanks to the weather people for absolutely no warning about this, I didn't move my car to more a more navigatable parking spot). This means I get to pretend for a little bit that I get to have leisurely mornings like this all the time. I can also share with you all my "cabinet knobs in the wall" project results.


It wasn't easy, I'll tell you that much. I went to Home Depot and not to knock them or anything, but does anyone else feel like they are never helpful. I have never had a project where they have helped me. When I asked the worker there what I should do he gave me the same "they have to go in a board that you attach to the wall" thing my uncle had already told me. When I looked at him and said "Well that's not what I want to do." He said good luck and walked off. Good thing I wasn't dealing with a true home improvement emergency.

Determined to figure it out on my own, I bought some chandelier swagging kits (looked like those had tons of options for anchoring items in them) for $2 each and headed home. I got out my drill and after making some scarily large holes in the wall (for the dry wall anchors, thanks for the idea Amanda!) I secured those knobs right into the wall. Board smoard! Those Home Depot guys need to learn how to think outside of the box! Hope you guys like it as much as I do!
Before: Empty wall space BORING (check out my dinosaur of a TV! I've had that thing since high school and it refuses to die)


After: Now this space doesn't look so boring and empty, and it's useful!


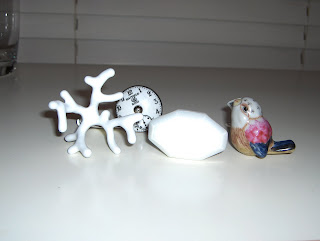
I decided on using only these three, although I bought more. Now I get to plan what to do with the other ones I have left over. Hmmm...


My favorite one is the little bird. He's so cute!


They are right next to my closet door for easy outfit accessorizing,


Ok, back to reality. Guess I should go check out the roads again and attempt to navigate the hill. Hopefully someone has gone before me and already cleared the way. Have a great day everyone!


Sunday, February 7, 2010

Winter Blues

I'm to the point now where I am over winter. I'm tired of being pale, wearing sweaters, and deep moisturizing. I'm trying to get myself through these next 6 weeks (how reliable is that groundhog thing anyways?) with visions of what I want to do to my back deck once the weather gets better. This question has been stumping me for the two years I've lived in this house, which is a bit alarming for me cause I always know what I want to do. Then last night HGTV brought the greatness and now I know exactly what I want to do.

Key West inspired back deck, straight from their new show The Outdoor Room with Jamie Durie. It has all the things I love: lush plants, white washing, soft fabrics, and pops of color. Now this is going to take some doing (removing a huge tree that blocks all the sunlight going back there, cutting down some of the giant fence, redoing the water rotted deck included) but at least I have a plan now. Whew I feel much better and I'm going to start planning all the steps as soon as the sun shines for more than one day at a time.

Oh and I am still working on that "knobs in the wall" project as my Dad calls it. I'm actually off to Home Depot now to consult with the experts. Wish me luck!

Friday, January 29, 2010

Snow Day


I'm home on a snow day (well really ice, but that doesn't sound very fun) and decided to catch up with ya'll since I'll be busy again next week and the blogging will continue at the slow pace it follows.

So I have a project that I am dying to do. But, not having very many handy-man-like skills I am not sure how to do it. After going in the Madewell store at Northpark mall I was inspired. See because of my job I have tons of necklaces. And I love them all so I want to wear them all, which makes storing them, yet being able to see them all a problem. At the Madewell store they had a wall of vintage cabinet knobs with necklaces hanging from them. GENIUS! I immediately knew I needed a wall like that in my room.
I bought some knobs at Anthropologie. Isn't the bird one cute?


And then I wasn't quite sure what to do next. So I hit the internet. Surely some blogger out there has attempted this project, mastered it, and written out her instructions for the rest of us to follow? Not so much. I haven't found any instructions, and only two pictures showing what I am trying to do.


So then I asked my carpenter uncle how he would do it, his idea to attach them to a wooden board, paint the board the same color as my wall, and then put the board on my wall is a good one. But it isn't the look I'm going for. My perfectionism comes back to haunt me.

My next step will be a trip to Home Depot, armed with the pictures showing what I want and the knobs. If they can't help me I might just have to go rogue and start trying to figure it out myself. If you have any ideas on what to do, let me know before I start drilling holes into my walls. :) Hopefully I will be able to post the finished product soon. Wish me luck!

Sunday, January 17, 2010

Craft day reimagined

Well I had big plans for an afternoon of crafting, but when I walked out to my car I saw that my neighbor's car looked like this. Mine is the blocked in white car (clearly) and there is only about a space of 4 feet to get by to get out of the parking lot.

Apparently he was having car problems, and the tow truck operator thought it would be a good idea to leave his car like this (where no one else could get in or out) for a few hours this afternoon. Brillant, I know. It being Sunday in the South barely anything is open anyways and what was open was closed by the time I was able to exit my parking lot.

So I decided to make the best of it with some major house cleaning (while watching the Cowboys get spanked, ouch). The main place I attacked was my guest room/home office. Now a home office didn't used to be very important to me because I had an office already, it just wasn't in my house. But now with Arbonne being a big part of my life I need a home office that functions for me, and since it is in my guest room it also needs to look nice.
Mine wasn't looking so nice as you can see.

After a few hours of organizing, some creative storage in my already overstuffed closets, and a new bulletin board from Hobby Lobby (bought yesterday when I could actually exit my parking lot) my desk is way way better and I don't want to run screaming for the hills at the thought of sitting down here to work.

There is one craft project that I did last night that I can share with you today. It is a monogrammed journal and I got the idea from the Real Simple Holiday gift guide. Now I am a sucker for anything monogrammed and since one of my new year's resolutions was to start keeping a journal I thought this was perfect.
Now for full disclosure I will put what the magzine pic looked like, but just remember professionals did those.


The inside cover was my best attempt. I have to say, with a bit more practice I could really learn to love doing this project.


The stamps on the top and bottom of all the pages was a bit difficult, but some of them came out.


It was impossible to do the stamps on the middle edge of the papers, they were always uneven. Which is why halfway through those I gave up on them. Sorry the pics are not so great (although it kind of hides how not professional my project looks)


So here are the instructions some of them I didn't do, maybe why mine didn't turn out exactly as planned. But I am still happy with my newly monogrammed journal anyways.

You need:1 hardback journal, set of alphabet stamps, stamp pad, rubber band, large binder clip, ruler, pencil

How to: Use the rubber band to secure three letter stamps together in monogram order (I did not think this one through and since my first and middle names have the same letter I only did my two initials) Practice stamping on a piece of scrap paper. Open the journal covers flat on the table. With the clip, clamp all the pages together (didn't do this part, maybe that's why I struggled). Stamp the edges of the stacked pages one side at a time, moving the clip as needed. Draw a light horizontal or, for a looser motif draw diagonal lines, across the paper (once again I skipped this step, but wish I hadn't) Stamp along the lines and let dry for 15 minutes. Erase pencil marks. Repeat for the inside back cover. Voila, you now have a monogrammed journal.

Let me know if any of you try this and have more success than I did with stamping the stacked pages. It was tough, let me tell you.


Saturday, January 16, 2010

Displaying my presents

I finally put all the Christmas decor away last weekend (while I had no water courtesy of my frozen pipes might I add). Then I got to put out all the lovelies I had gotten for Christmas!!

So re-doing a "fixer upper" can get overwhelming at times, especially without a plan. At first I didn't have a plan. I was just doing something here, something there and I never felt like I was changing anything. So I took a page out of my Aunt Gail's (the queen of remodeling) book and made a plan to do it a room at a time. Also, to make myself feel like the task wasn't impossible, I started with my smallest/least to do room, the downstairs half bathroom. I always knew I wanted two shelves with white pots on them in this bathroom, but I didn't really plan for what was going to go on the shelves with the pots. Once I decided I wanted pretty perfume bottles on there, I had trouble finding any (typical). Mom to the rescue, she gave me two great bottles for Christmas and now I feel like the shelves are complete and look fab. Also Robyn gave me the pretty little plate for Christmas and I felt like it fit in perfectly. It is vintage Limoges china, tres chic!

A close up of the bottles, the clear ones are Mom's Christmas presents to me, the green one is from believe it or not Hobby Lobby, and the pink one is Michael Kors Very Hollywood perfume that a vendor sent me for Christmas (thanks Pam!).


At Holiday House there was a booth filled with the most wonderful shabby chic items, and I made sure my mom knew how much I loved all of their stuff. And of course because she's the best she took note and bought me stuff from there for Christmas and managed to keep it a secret for over a month. My first item, a beautiful hanging crystal that now hangs on my french doors.


The other thing she got me was the cutest little odds and end rack that I put at the top of my staircase so I can grab things on the run. Hope they come back to Holiday House next year, I have a feeling there is nothing they have that I wouldn't love.

The last one was really a gift I gave myself, but I think it is pretty perfect since my condo number is 2 and I really love the old timey font.


Those are all the wonderful home decor items I was given for Christmas. I am off to do some crafting, will post pics tomorrow (if the crafts turn out that is). Also go Cowboys, big playoff game tomorrow. Keeping my fingers crossed.


Wednesday, December 30, 2009

These are a few of my favorites

So the holiday season has killed the blogging. But now I'm on vacay (yay!) and have time for sharing with you all a few of my favorite pictures from this holiday season. There are a few I still need emailed to me (cough, cough, hint hint family members), but the ones below were mine so I can post them. Enjoy!

I seriously can't believe it, but we had a white Christmas in Texas! Now you would think my little lap dog wouldn't like bad weather, but he loves it. Rain, wind, and apparently snow too. So we had fun playing in the Texas snow.

He liked to rub his face in the snow. I know he's crazy, what can I say?

How he looked after the face rubbing. He's like the abominable snow pup!


The most hilarious Christmas lights I have ever seen. And this house is on a main corner in a nice neighborhood. I see it on my drive home every evening and this always gets me in the holiday spirit.

Eddie heads here as soon as the tree goes up. I don't know why, but this is where he hangs out at my Mom's during the holidays.


So I'm not saying he lives in Arkansas or anything (although we do have a booming retiree population, what better way to blend in?) but I drove behind him one day to work and I swear this man was him. Just look a the license plate. And a red truck? Who else could it be?


And to sum it all up my possible Christmas card for next year? Oh who am I kidding, I'll never be able to take the time to get actual pictures printed on cards for Christmas but here's to dreaming.


I hope you all liked the pics. I might have more to share later, but for now that's all. Later!


Wednesday, December 2, 2009

They call it Jerry world

Over Thanksgiving weekend my Baylor Bears played football against the Texas Tech Red Raiders at the new Cowboys Stadium. I was super excited to get to see the stadium without shelling out tons of moola for a pro game ticket. And by the way, the Bears really didn't play too badly and everyone stayed until the end of the game, yipee! Below are the pics of the stadium they call Jerry World (for Jerry Jones the owner of the Cowboys and the one who has to foot the bill for this thing, for those of you who have been living under a rock this fall.)
The screen that has caused so much controversy (and a few kickoff issues.) This thing is unbelievably huge, even though we were close to the field I found myself watching this thing because you can see everything on it.


The field, and the Baylor Gold Wave Band getting ready to do an opening number.

One end of the stadium. These windows make it feel like you are outside even though you aren't. It is so cool.


Me and Dad (wearing his green and gold no less)


I really hope they make this game a Thanksgiving weekend tradition because it was a lot of fun. A crowd of over 71,000 doesn't hurt in convincing them to do it again either :). Until next time when I have updates on the long lost and now found vintage Minolta camera and my Christmas decor (I know you all cannot wait.)